There are semi-automatic and automatic auger powder filling machines:
How should a semi-automatic auger filling machine be used?
Preparation:
Plugin the power adapter, turn on the power and then turn the "main power switch" clockwise 90 degrees to turn on the power.

Note: The device is exclusively equipped with a three-phase five-wire socket, a three-phase live line, a one-phase null line, and a one-phase ground line. Be careful not to use the wrong wiring or it could result in the electrical components’ damage or electric shock. Before connecting, make sure that the power supply matches the power outlet and that the chassis is securely grounded. (A ground line must be connected; otherwise, not only is it unsafe, but it also causes a lot of interference to the control signal.)In addition, our company can customize a single-phase or three-phase 220V power supply for an automatic packaging machine.
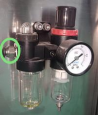
2.Attach the required air source at the inlet: pressure P ≥0.6mpa.
3.Rotate the red "Emergency stop" button clockwise to let the button jump up. Then you can control the power supply.

4.First, do a "function test" to ensure that all components are in good working order.
Enter working state:
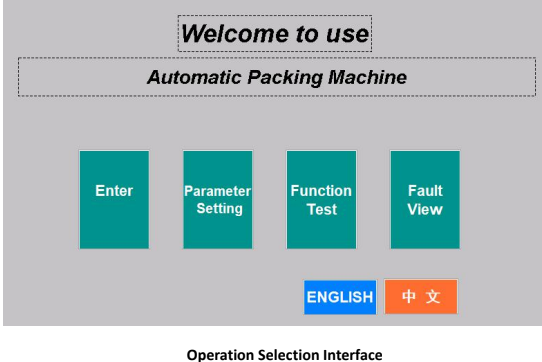
1. Turn on the power switch to enter the boot interface (Figure 5-1). The screen shows the company logo and related information. Click anywhere on the screen, enter the operation selection interface (Figure 5-2).
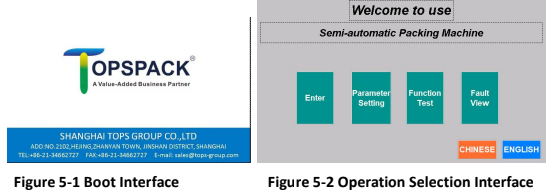
2. The Operation Selection interface has four operation options, which have the following meanings:
Enter: Enter the main operating interface, shown in Figure 5-4.
Parameter Setting: Set all the technical parameters.
Function Test: Interface of Function Test to Check Whether They’re in Normal Working Condition.
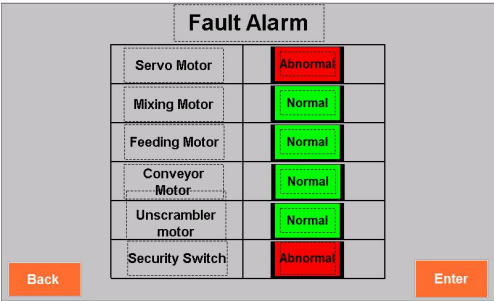
Fault View: View the fault condition of the device.
Function Test:
Click "Function Test" on the operation selection interface to enter the function test interface, shown in Figure 5-3. The buttons on this page are all function test buttons. Click on one of them to start the corresponding action, and click again to stop. At the machine’s initial start-up, enter this page to run a function test. Only after this test can the machine run normally, and it’s able to enter the shakedown test and formal work. If the corresponding component is not working properly, troubleshoot first, then continue the work.
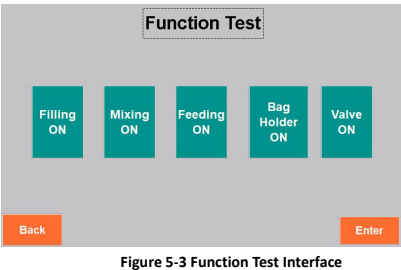
"Filling ON": After you’ve installed the auger assembly, start the filling motor to test the auger's running condition.
"Mixing ON": Start the mixing motor to test the mixing condition. Whether the mixing direction is correct (if it’s not, reverse the power supply phase), whether there is noise or collision of the auger (if there is, stop immediately and troubleshoot).
"Feeding ON": Start the supporting feeding device.
"Valve ON": Start the solenoid valve. (This button is reserved for the packaging machine equipped with pneumatic devices. If there’s none, you don’t need to set it.)
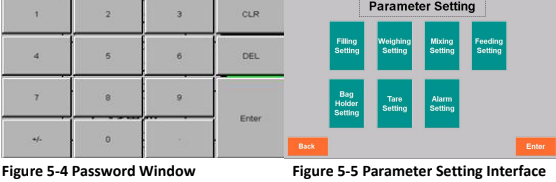
Parameter Setting:
Click "Parameter setting" and enter the password in the parameter setting interface's password window. First, as shown in Figure 5-4, enter the password (123789). After entering the password, you will be taken to the device parameter setting interface. (Figure 5-5) All parameters in the interface are stored in the corresponding formulations at the same time.
Filling setting: (Figure 5-6)
Filling mode: Choose volume mode or weight mode.
When you choose volume mode:
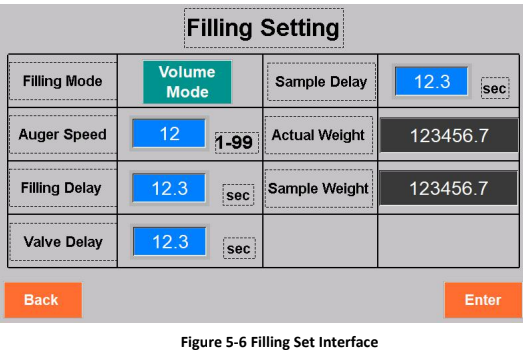
Auger Speed: The speed at which the filling auger rotates. The faster it is, the faster the machine fills. Based on the material’s fluidity and its proportion adjustment, the setting is 1–99, and it is recommended that the screw speed be about 30.
Valve Delay: Delay time before the auger valve shuts down.
Sample Delay: The amount of time it takes for the scale to receive the weight.
Actual Weight: This displays the weight of the scale at this moment.
Sample Weight: Weight read through the internal program.
When you choose volume mode:

Fast fill speed: the rotating speed of the auger for fast fill.
Slow fill speed: the rotating speed of the auger for slow fill.
Fill delay: the time it takes to fill a container after it has been started.
Sample Delay: The amount of time it takes for the scale to receive the weight.
Actual Weight: Displays the weight of the scale at this moment.
Sample Weight: Weight read through the internal program.
Valve delay: the delay time for the weight sensor to read the weight.
Mixing set: (Figure 5-7)
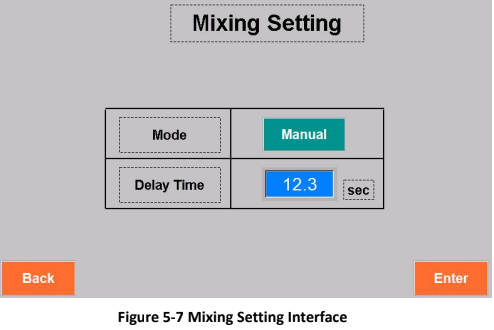
Mixing mode: choose between manual and automatic.
Auto: the machine starts filling and mixing at the same time. When the filling is over, the machine will automatically stop mixing after the mixing "delay time". This mode is suitable for materials with good fluidity to prevent them from falling because of mixing vibrations, which will result in a large deviation of the packaging weight. If the filling time is less than the mixing is "delay time", mixing will be continuously going without any pause.
Manual: you’ll manually start or stop mixing. It’ll keep on doing the same action until you change the way you think. The usual mixing mode is manual.
Feeding set: (Figure 5-8)
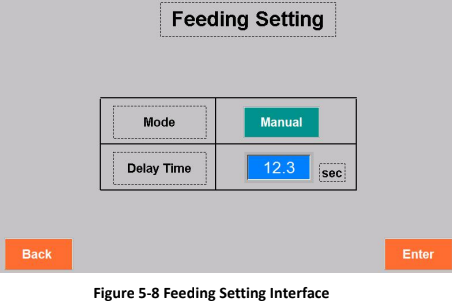
Feeding mode: choose between manual or automatic feeding.
Auto: if the material-level sensor cannot receive any signal during the feeding's "delay time," the system will judge it as a low material level and start feeding. Manual feeding means that you’ll manually start feeding by turning on the feeding motor. The usual feeding mode is automatic.
Delay Time: When the machine is automatically feeding because the material fluctuates in undulating waves during the mixing, the material-level sensor sometimes receives the signal and sometimes cannot. If there’s no delay time for feeding, the feeding motor will over-frequently start, leading to damage to the feeding system.
Scale set: (Figure 5-9)
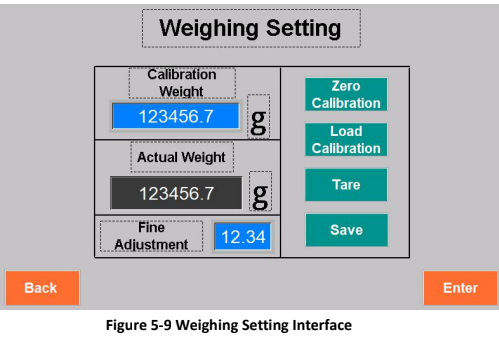
Calibrate Weight: This is the nominal calibration weight. This machine uses 1000 g of weight.
Tare: to recognize all the weight on the scale as the tare weight. The "Actual weight" now is "0".
Steps in calibration
1) Click "Tare"
2) Click "Zero Calibration". The actual weight should be displayed as "0". 3) Put 500g or 1000g weights on the tray and click "load Calibration". The displayed weight should be consistent with the weight of the weights, and the calibration will be successful.
4) Click "save" and the calibration is complete. If you click "load Calibration" and the actual weight is inconsistent with the weight, please recalibrate according to the above steps until it is consistent. (Note that each button clicked must be held down for at least a second before releasing).
Save: save the calibrated result.
Actual weight: the item weight on the scale is read through the system.
Alarm set: (Figure 5-10)
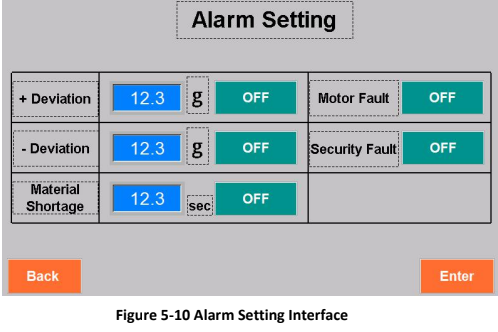
+ Deviation: actual weight is larger than target weight. If the balance exceeds the overflow, the system will alarm.
-Deviation: actual weight is smaller than target weight. If the balance exceeds the underflow, the system will alarm.
Material shortage: material-level sensors cannot feel material for a period of time. After this "less material" time, the system will recognize there’s no material in the hopper and therefore alarm.
Motor Fault: If there is a problem with the motors, the window will appear. This function should always be open.
Security fault: For open-type hoppers, if the hopper is not closed, the system will alarm. Modular hoppers don’t have this function.
Packing Operating Procedure:
Please read the following section carefully to learn about the formal packaging's main operations and parameter settings.
It is recommended to use the volume mode if the material density is even.
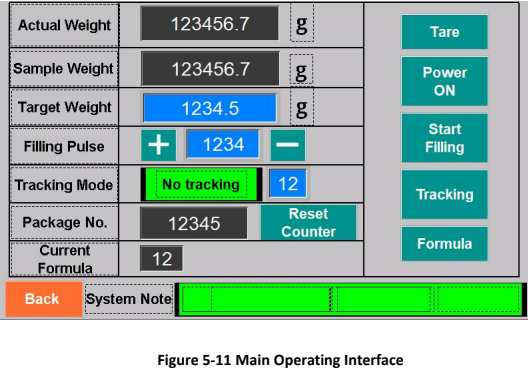
1. Click "Enter" on the Operation Selection Interface to enter the main operating interface. (Figure 5-11)
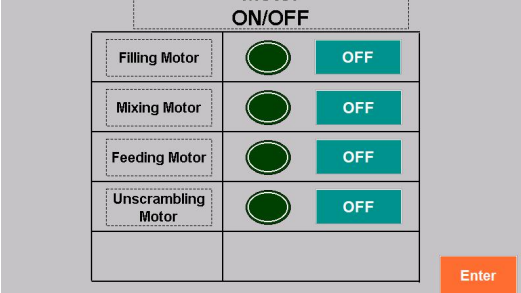
2. Click "Power ON," and the selecting page for "Motor Set" pops up, as shown in Figure 5-12. After you have selected each motor on or off, click the "Back to Work page" button to go into standby.
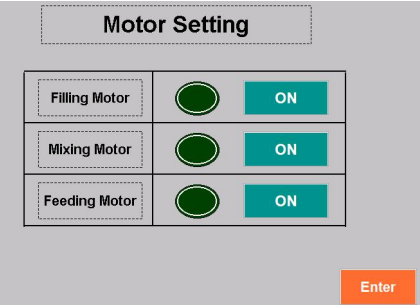
Figure 5-12 Motor Set Interface
Filling motor: Start filling motor.
Mixing motor: Start mixing motor.
Feeding motor: Start feeding motor.
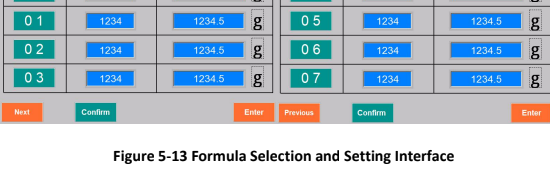
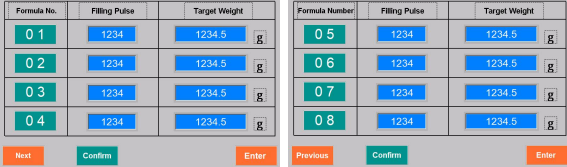
3. Click "Formula" to enter the formula selection and setting page, as shown in Figure 5-13. The formula is the memory area of all kinds of material’s filling changes according to their respective proportions, mobility, packaging weight, and packaging requirements. It has 2 pages of 8 formulas. When replacing the material, if the machine previously had the formula record of the same material, you can quickly call up the corresponding formula into production status by clicking "Formula No." and then clicking "Confirm", and there’s no need to re-adjust device parameters. If you need to save a new formula, select a blank formula. Click "Formula No." and then click "Confirm" to enter this formula. All subsequent parameters will be saved in this formula until you select other formulas.
4. Click "+, -"of "filling plus" to fine-tune the filling pulse volume. Click on the number area of the window, and the number input interface pops up. You can directly type in pulse volumes. (The servo motor of the auger filler has 1 rotation of 200 pulses. By fine-tuning the pulses, you can adjust the filling weight to reduce deviations.)
5. Click "Tare" to recognize all the weight on the scale as the tare weight. The weight displayed in the window now is "0." To make the packaging weight the net weight, the outer packing should be placed on the weighing device first and then tare. The displayed weight is then the net weight.
6. Click the number area of "Target Weight" to let the number input window pop up. Then type in the target weight.
7. Tracking Mode, Click "Tracking" to switch to tracking mode.
Tracking: In this mode, you must put the packaging material that has been filled onto the scale, and the system will compare the actual weight with the target weight. If the actual filling weight is different from the target weight, pulse volumes will automatically increase or decrease according to the pulse volumes in the number window. And if there’s no deviation, there’s no adjustment. Pulse volumes will automatically adjust once each time it's filled and weighed.
No Tracking: This mode does not do automatic tracking. You can arbitrarily weigh packaging material on the scale, and pulse volumes will not automatically adjust. You need to manually adjust pulse volumes to change filling weight. (This mode is only suitable for very stable packaging material. Its fluctuation of pulses is small, and the weight has hardly any deviation. This mode can help improve packaging efficiency.)
8. "Package No." This window is mainly for the accumulation of packaging numbers. The system keeps one record each time it fills up. When you need to clear the cumulative package number, click "Reset Counter," and the packaging count will be cleared.
9. "Start Filling" Under the condition of "Filling motor ON," click it once and the filling auger rotates once to finish one filling. This operation has the same result as stepping down on the footswitch.
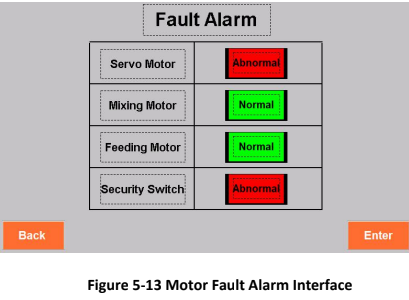
10. System Prompt "System note." This window displays the system alarm. If all the components are ready, it’ll display "System Normal". When the device doesn’t respond to conventional operation, check the system prompt. Troubleshoot according to the prompt. When the motor current is too large due to a lack of phase or foreign objects blocking it, the "Fault Alarm" window pops up. The device has the function of protecting the motor from over-current. Therefore, you must find the cause of the over-current. Only after troubleshooting can the machine continue to work.
It is recommended to use the weighing method if the material density is not uniform and you want high precision.
1. Click "Enter" on the Operation Selection Interface to enter the main operating interface. (Figure 5-14)
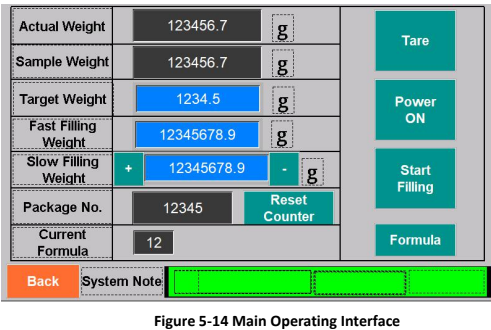
Actual weight: The actual weight is displayed in the digital box.
The sample weight: The digital box shows the weight of the previous can.
Target weight: Click the number box to enter the target weight.
Fast filling weight: click the number box and set the weight of the fast filling.
Slow filling weight: click the digital box to set the weight of slow filling, or click the left and right of the digital box to fine-tune the weight. The fine-tuning amount of addition and subtraction should be set on the filling setting interface.
When the weight sensor detects that the set fast filling weight has been reached, the slow filling weight is changed, and the filling stops when the weight of slow filling is reached. Generally, the weight set for fast filling is 90% of the package weight, and the remaining 10% is completed by slow filling. The weight set for slow filling is equal to the package weight (5-50g). The specific weight needs to be adjusted on-site according to the package weight.
2. Click "Power ON," and the selecting page of "Motor Setting" pops up, as shown in Figure 5-15. After you have selected each motor on or off, click the "Enter" button into standby.
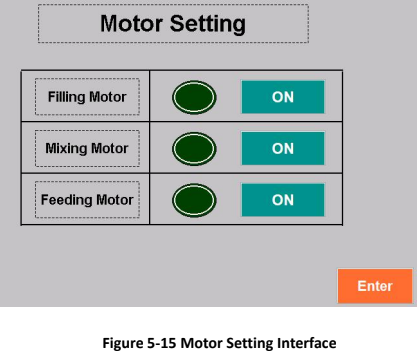
Filling motor: Start filling motor.
Mixing motor: Start mixing motor.
Feeding motor: Start feeding motor.
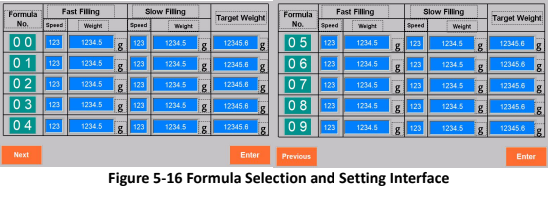
3. Click "Formula" to enter the formula selection and setting page, as shown in Figure 5-16. The formula is the memory area of all kinds of material’s filling changes according to their respective proportions, mobility, packaging weight, and packaging requirements. It has 2 pages of 8 formulas. When replacing the material, if the machine previously had the formula record of the same material, you can quickly call up the corresponding formula into production status by clicking "Formula No." and then clicking "Confirm", and there’s no need to re-adjust device parameters. If you need to save a new formula, select a blank formula. Click "Formula No." and then click "Confirm" to enter this formula. All subsequent parameters will be saved in this formula until you select other formulas.
How should an automatic auger filling machine be used?
Preparation:
1) Plug in the power socket, turn on the power, and turn the “main power switch”
Clockwise by 90 degrees to turn on the power.

NOTE: The device is exclusively equipped with a three-phase five-wire socket, a three-phase live line, a one-phase null line, and a one-phase ground line. Be careful not to use the wrong wiring or it could result in the electrical components’ damage or electric shock. Before connecting, make sure that the power supply matches the power outlet and that the chassis is securely grounded. (A ground line must be connected; otherwise, not only is it unsafe, but it also causes a lot of interference to the control signal.)In addition, our company can customize a single-phase or three-phase 220V power supply for an automatic packaging machine.
2.Attach the required air source at the inlet: pressure P ≥0.6mpa.
3.Rotate the red "Emergency stop" button clockwise to let the button jump up. Then you can control the power supply.
4.First, do a "function test" to ensure that all components are in good working order.
Enter work
1.Turn on the power switch to enter the operation selection interface.
2. The Operation Selection interface has four operation options, which have the following meanings:
Enter: Enter the main operating interface, shown in Figure 5-4.
Parameter Setting: Set all the technical parameters.
Function Test: Interface of Function Test to Check Whether They’re in Normal Working Condition.
Fault View: View the fault condition of the device.
Function and setting:
Please read the following section carefully to learn about the formal packaging's main operations and parameter settings.
1.Click "Enter" on the Operation Selection Interface to enter the main operating interface.
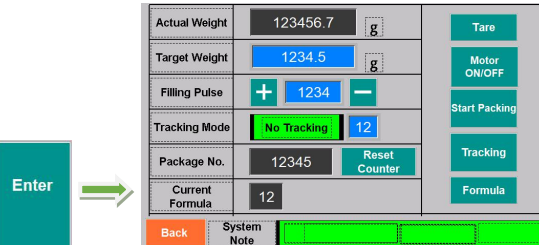
Actual Weight: The number box shows the current actual weight.
Target Weight: Click the number box to enter the weight to be measured.
Filling Pulse: Click the number box to enter the number of filling pulses. The number of filling pulses is proportional to the weight. The greater the number of pulses, the greater the weight. The servo motor of the auger filler has 1 rotation of 200 pulses. The user can set the corresponding pulse number according to the packaging weight. You can click +-on the left and right of the number box to fine-tune the number of filling pulses. The setting of "fine tracking" for each addition and subtraction can be set in "fine tracking" under tracking mode.
Tracking Mode: two modes.
Tracking: In this mode, you must put the packaging material that has been filled onto the scale, and the system will compare the actual weight with the target weight. If the actual filling weight is different from the target weight, pulse volumes will automatically increase or decrease according to the pulse volumes in the number window. And if there’s no deviation, there’s no adjustment. Pulse volumes will automatically adjust once each time it's filled and weighed.
No Tracking: This mode does not do automatic tracking. You can arbitrarily weigh packaging material on the scale, and pulse volumes will not automatically adjust. You need to manually adjust pulse volumes to change the filling weight. (This mode is only suitable for very stable packaging material. Its fluctuation of pulses is small, and the weight has hardly any deviation. This mode can help improve packaging efficiency.)
Package No. : It is primarily used to keep track of packaging numbers.
The system does one record each time it fills up. When you need to clear the cumulative package number, click "Reset Counter," and the packaging count will be cleared.
Formular: enter formula selection and setting page, the formula is the memory area of all kinds of material’s filling changes according to their respective proportions, mobility, packaging weight, and packaging requirements. It has 2 pages of 8 formulas. When replacing the material, if the machine previously had the formula record of the same material, you can quickly call up the corresponding formula into production status by clicking "Formula No." and then clicking "Confirm", and there’s no need to re-adjust device parameters. If you need to save a new formula, select a blank formula. Click "Formula No." and then click "Confirm" to enter this formula. All subsequent parameters will be saved in this formula until you select other formulas.
Tare weight: consider all of the weight on the scale to be the tare weight. The weight display window now says "0." To make the packaging weight the net weight, the outer packaging should be placed on the weighing device first and then tare. The displaying weight is then the net weight.
Motor ON/OFF: Enter this interface.
You can manually select the opening or closing of each motor. After the motor is opened, click the "Back" button to return to the working interface.
Start Packing: Under the condition of "motor ON," click it once and the filling auger rotates once to finish one filling.
System Note: It displays the system alarm. If all components are ready, it’ll display "System Normal". When the device doesn’t respond to conventional operation, check the system note. Troubleshoot according to the prompt. When the motor current is too large due to a lack of phase or foreign objects blocking it, the "Fault Alarm" interface pops up. The device has the function of protecting the motor from over-current. Therefore, you must find the cause of the over-current. Only after troubleshooting the machine can it continue to work.
Parameter Setting
By clicking "Parameter Setting" and entering the password 123789, you enter the parameter setting interface.
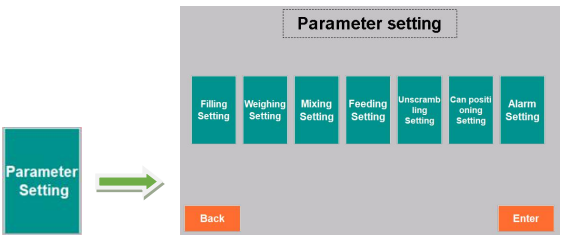
1.Filling Setting
Click "Filling Setting" on the parameter setting interface to enter the filling setting interface.
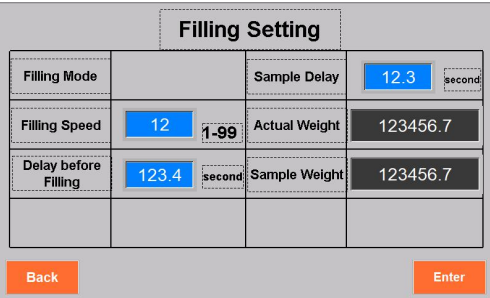
Filling Speed: Click the number box and set the filling speed. The larger the number, the faster the feeding speed will be. Set the range from 1 to 99. It is recommended to set a range of 30 to 50.
Delay before Filling: The amount of time that must elapse before filling. It is recommended to set the time between 0.2 and 1 s.
Sample Delay: The amount of time it takes for the scale to receive the weight.
Actual Weight: Displays the weight of the scale at this moment.
Sample weight: is the weight of the most recent packing.
1) Mixing Setting
Click "Mixing Setting" on the parameter setting interface to enter the mixing setting interface.
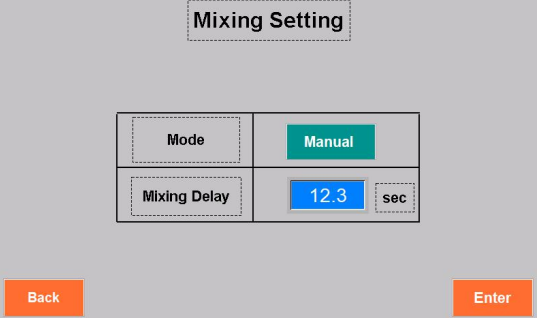
Choose between manual and automatic mode.
Automatic: this means that the machine starts filling and mixing at the same time. When the filling is over, the machine will automatically stop mixing after a delayed time. This mode is suitable for materials with good fluidity to prevent them from falling because of mixing vibrations, which will result in a large deviation of the packaging weight.
Manual: it will go on continuously without any pause. Manual mixing means that you’ll manually start or stop mixing. It’ll keep on doing the same action until you change the way it's set up. The usual mixing mode is manual.
Mixing delay: When using automatic mode, it is best to set the time between 0.5 and 3 seconds.
For manual mixing, the delay time does not need to be set.
3) Feeding Setting
Click "Feeding Setting" on the parameter setting interface to enter the feeding interface.
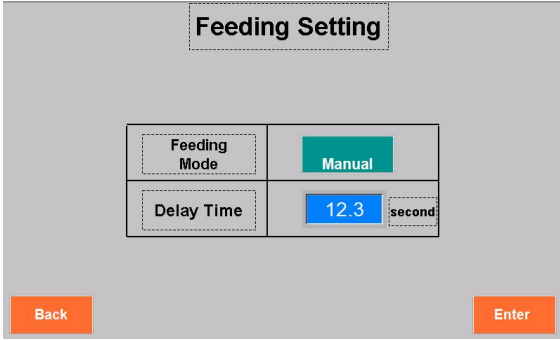
Feeding Mode: Choose between manual or automatic feeding.
Automatic: if the material-level sensor cannot receive any signal during the feeding's "Delay Time", the system will judge it as a low material level and start feeding. The usual feeding mode is automatic.
Manual: you’ll manually start feeding by turning on the feeding motor.
Delay Time: When the machine is automatically feeding because the material fluctuates in undulating waves during the mixing, the material-level sensor sometimes receives the signal and sometimes cannot. If there’s no delay time for feeding, the feeding motor will over-frequently start, leading to damage to the feeding system.
4) Unscrambling Setting
Click "Unscrambling Setting" on the parameter setting interface to enter the unscrambling interface.
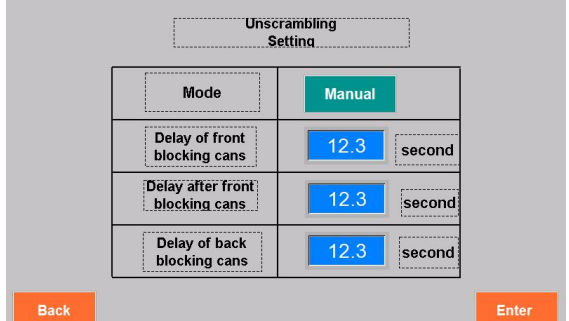
Mode: Choose manual or automatic unscrambling.
Manual: it is manually opened or closed.
Automatic: it will start or stop according to the preset rules, that is, when the output cans have reached a certain number or caused congestion, it will stop automatically, and when the number of cans on the conveyor is reduced to a certain amount, it will start automatically.
Set the "Delay of front blocking cans" by clicking the number box.
The can unscrambler stops automatically when the photoelectric sensor detects that the jam time of the cans on the conveyor exceeds the "Delay of front blocking cans."
Delay after front blocking cans: Click the number box to set the "delay after front blocking cans". When the jam of cans on the conveyor is removed, the cans move forward normally, and the can unscrambler will start automatically after the delay.
Delay of back-blocking cans: Click the number box to set the delay of back-blocking cans. A back-can-blocking photo electricity sensor can be installed on the can discharging belt connected with the back end of the equipment. When the photo electricity sensor detects that the jam time of the packed cans exceeds the "delay of back blocking cans," the packaging machine will automatically stop working.
5) Weighing Setting
Click "Weighing Setting" on the parameter setting interface to enter weighing setting interface.
Calibration Weight: The calibration weight shows 1000g, indicating the weight of the calibration weight of the weighing sensor of the equipment.
Scale Weight: It is the actual weight on the scale.
Steps in calibration
1) Click "Tare"
2) Click "Zero Calibration". The actual weight should be displayed as "0", 3) Put 500g or 1000g weights on the tray and click "load Calibration". The displayed weight should be consistent with the weight of the weights, and the calibration will be successful.
4) Click "save" and the calibration is complete. If you click "load calibration" and the actual weight is inconsistent with the weight, please recalibrate according to the above steps until it is consistent. (Note that each button clicked must be held down for at least a second before releasing).
6) Can Positioning Setting
Click "Can Positioning Setting" on the parameter setting interface to enter the Can Positioning Setting interface.
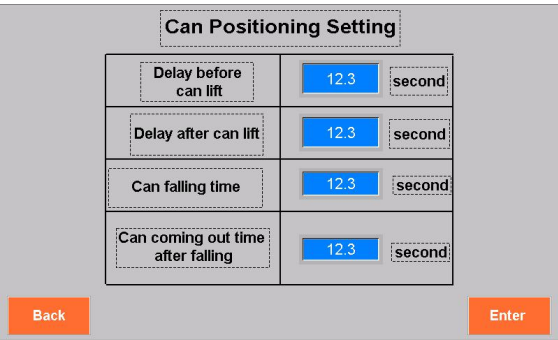
Delay before can lift: Click the number box to set "delay before can lift". After the can is detected by the photoelectric detector, after this delay time, the cylinder will work and position the can below the filling outlet. The delay time is adjusted according to the can size.
Delay after Can Lift: Click the number box to set the delay time. After this delay time has passed, you can lift the cylinder and perform lift resets.
Can filling time: the amount of time it takes for the jar to fall after it has been filled.
Can coming out time after falling: Can coming out time after falling.
7) Alarm Setting
Click "Alarm Setting" on the parameter setting interface to enter alarm setting interface.
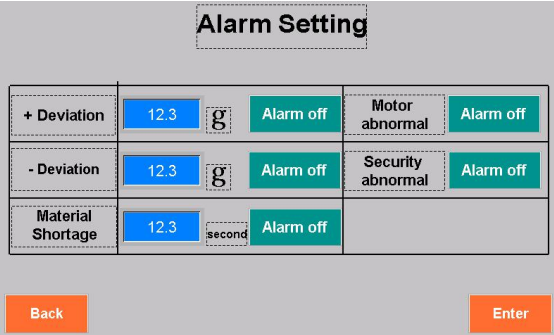
+ Deviation: The actual weight is greater than the target weight. If the balance exceeds the overflow, the system will alarm.
-Deviation: actual weight is smaller than target weight. If the balance exceeds the underflow, the system will alarm.
Material Shortage: A material-level sensor cannot feel material for a while. After this "less material" time, the system will recognize there’s no material in the hopper and therefore alarm.
Motor abnormal: The window will pop up if any fault happens to the motors. This function should always be open.
Security abnormal: For open-type hoppers, if the hopper is not closed, the system will alarm. Modular hoppers don’t have this function.
NOTE: Our machines are manufactured according to customers’ requirements through strict testing and inspection, but in the transport process, there may be some components that have become loosened and worn. Therefore, upon receipt of the machine, please check the packaging and the surface of the machine as well as accessories to see if any damage occurred during transport. Read these instructions carefully when you’re using the machine for the first time. Internal parameters should be set and adjusted according to the specific packing material.
5.Function Test
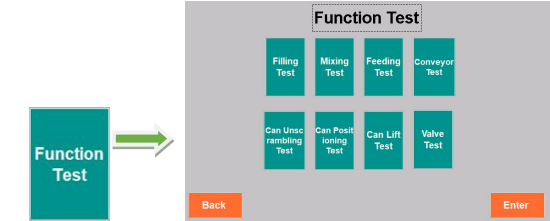
Filling Test: Click the "filling test" and the servo motor will start. Click the button again and the servo motor will stop. If the servo motor does not operate, please check the filling setting interface to see if the fixed moving speed is set. (Do not go too fast in the case of spiral idling)
Mixing Test: Click the "Mixing Test" button to start the mixing motor. Click the button again to stop the mixing motor. Check the mixing operation and see if it is correct. The mixing direction is rotated clockwise (if incorrect, the power phase should be switched). If there is noise or a collision with the screw (if there is, stop immediately and remove the fault).
Feeding Test: Click the "Feeding Test" and the feeding motor will start. Click the button again and the feeding motor will stop.
Conveyor Test: Click the "conveyor test," and the conveyor will start. Click the button again and it will stop.
Can Unscramble Test: Click "Can unscramble test" and the motor will start. Click the button again and it will stop.
Can Positioning Test: Click the "can positioning test", the cylinder does action, then click the button again, and the cylinder is reset.
Can Lift Test: click the "can lift test" and the cylinder does the action. Click the button again, and the cylinder resets.
Valve Test: Click the "Valve Test" button, and the bag-clamping cylinder does action. Click the button again, and the cylinder resets. (Please disregard if you are unaware of this.)
Post time: Apr-07-2022